Patching ------ पैचिंग
Patching is the process where you tell the console
- What type of lighting units you have connected to it
- What DMX addresses they are operating at
- Which DMX line (universe) each unit is connected to (there are 64 lines, but the console itself can only output 16 lines; further lines can be controlled using networked DMX processors over TitanNet)
- Which buttons on the console you want to use to access them (either physical buttons or touch buttons)
- Particular option settings for each fixture.
पैचिंग वह प्रक्रिया है जिसमें आप कंसोल को बताते हैं:
आपके पास कौन से प्रकार के लाइटिंग यूनिट्स जुड़े हैं।
वे किस DMX पते पर काम कर रहे हैं।
प्रत्येक यूनिट किस DMX लाइन (यूनिवर्स) से जुड़ी है (कुल 64 लाइनें हैं, लेकिन कंसोल स्वयं केवल 16 लाइनें आउटपुट कर सकता है; आगे की लाइनें नेटवर्क DMX प्रोसेसर के जरिए TitanNet के माध्यम से नियंत्रित की जा सकती हैं)।
कंसोल पर आप किस बटन का उपयोग करना चाहते हैं (या तो भौतिक बटन या टच बटन)।
प्रत्येक फिक्स्चर के लिए विशेष विकल्प सेटिंग्स।
Before you start rigging, you can use the console to work out the DMX addresses for the fixtures in your rig. Patch them on the console (or simulator), then press Open/View, Patch to show the Patch View window. This will use the DMX channels as efficiently as possible without leaving any gaps.
रिगिंग (सज्जा) शुरू करने से पहले, आप कंसोल का उपयोग करके अपने रिग के फिक्स्चर के लिए DMX पते का काम निकाल सकते हैं। उन्हें कंसोल (या सिम्युलेटर) पर पैच करें, फिर Open/View दबाएं, फिर Patch पर क्लिक करें। इससे Patch View विंडो दिखाई देगी, जो DMX चैनलों का उपयोग इस प्रकार से करेगी कि कोई अंतराल न हो।
If your fixtures are RDM equipped, the console can patch itself from the rig, see Patching By RDM.
On older consoles with a System/Run/Program switch, the switch must be set to Program before you can patch.
By default in a new show, each physical DMX output socket (5 pin XLR) is connected to a DMX line. If you want to change this or use other lines, go to the DMX Settings window from the System menu.
यदि आपके फिक्स्चर RDM से सुसज्जित हैं, तो कंसोल अपने आप रिग से पैच कर सकता है, इसके लिए Patching by RDM देखें।
पुराने कंसोल्स में, जिनमें System/Run/Program स्विच होता है, उस स्विच को पैच करने से पहले Program पर सेट करना आवश्यक है।
नए शो में, प्रत्येक भौतिक DMX आउटपुट सॉकेट (5 पिन XLR) DMX लाइन से जुड़ा होता है। यदि आप इसे बदलना चाहते हैं या अन्य लाइनों का उपयोग करना चाहते हैं, तो DMX Settings विंडो पर जाएं जो System मेनू से उपलब्ध है।
If nothing is happening to the lights when you make changes on the console it is worth checking the DMX Setting window to make sure the DMX lines are allocated to outputs.
यदि आप कंसोल पर परिवर्तन करते समय लाइट्स में कोई प्रतिक्रिया नहीं देख रहे हैं, तो यह सुनिश्चित करने के लिए DMX Settings विंडो जांचें कि DMX लाइनों को आउटपुट्स पर आवंटित किया गया है या नहीं।
Patching New Fixtures or Dimmers --- नए फिक्स्चर या डिमर्स को पैच करना
Fixture Select Buttons and Handles --- फिक्स्चर चयन बटन और हैंडल्स
To control intelligent fixtures or dimmer channels, they must each be patched to a button (sometimes referred to as a “handle”). You can patch onto touch buttons in the Fixtures window, to a fader handle or to a Macro/Executor button. If the handle you patch to has a fader, the fader will control intensity.
If the Fixtures window is not shown, press Open/View then Fixture or double press Open/View then press Fixtures from the window select buttons.
इंटेलिजेंट फिक्स्चर या डिमर चैनलों को नियंत्रित करने के लिए, उन्हें प्रत्येक को एक बटन (जिसे कभी-कभी “हैंडल” कहा जाता है) पर पैच किया जाना चाहिए। आप इन्हें फिक्स्चर विंडो में टच बटन पर, फेडर हैंडल पर, या एक मैक्रो/एक्जीक्यूटर बटन पर पैच कर सकते हैं। यदि आप जिस हैंडल पर पैच कर रहे हैं उसमें फेडर है, तो फेडर इंटेंसिटी को नियंत्रित करेगा।
यदि Fixtures विंडो नहीं दिखाई दे रही है, तो Open/View दबाएं फिर Fixture पर क्लिक करें या Open/View दबाकर Fixtures को विंडो चयन बटन से डबल प्रेस करें।

Fixture buttons can be shown either in pages with Page buttons, or you can use the scroll bar on the right to show different pages. Use the Pages Show/Hide button in the context buttons on the right of the screen to select between page buttons and scrolling mode (these buttons drop down using the menu button in the window top bar for Sapphire Touch and Titan Go). You can change the fixture page at any time.
You can allocate fixtures and dimmers to Groups, which allows you to quickly select a set of fixtures with one button. Groups are described in the next chapter.
Once you have patched fixtures or dimmers, the Patch View screen shows you an overview of what is patched where and lets you edit the patch.
फिक्स्चर बटन को या तो पेज़ बटन के साथ पेज़ में दिखाया जा सकता है, या आप दाहिनी ओर के स्क्रॉल बार का उपयोग करके विभिन्न पेज़ दिखा सकते हैं। स्क्रीन के दाहिनी ओर के संदर्भ बटन में Pages Show/Hide बटन का उपयोग करके आप पेज़ बटन और स्क्रॉलिंग मोड के बीच चयन कर सकते हैं (ये बटन Sapphire Touch और Titan Go के लिए विंडो टॉप बार में मेनू बटन का उपयोग करके ड्रॉप डाउन होते हैं)। आप किसी भी समय फिक्स्चर पेज़ को बदल सकते हैं।
आप फिक्स्चर और डिमर्स को ग्रुप्स में आवंटित कर सकते हैं, जो आपको एक बटन से फिक्स्चर का सेट जल्दी से चयन करने की सुविधा देता है। ग्रुप्स के बारे में अगला अध्याय विवरण देगा।
एक बार जब आपने फिक्स्चर या डिमर्स को पैच कर लिया, तो Patch View स्क्रीन आपको यह अवलोकन दिखाती है कि क्या पैच किया गया है और कहां पैच किया गया है, और आपको पैच को संपादित करने की सुविधा भी देती है।
Patching Dimmers
Each fixture button can control single or multiple dimmer channels. You allocate a button using the Patch menu (described below) or the Patch View window.
- To patch a single dimmer, press a Fixture touch button, a Macro/Executor button or the Select button of a fader handle. To patch a sequence of dimmers each to its own button, press Quantity and set the number of dimmers then press the first select button. Alternatively, run your finger or draw a selection box round the touch buttons, or for physical buttons hold down the first button in the range and press the last button in the range. The range of dimmers will be patched to sequential DMX addresses.
- A fixture button turns dark blue and shows fixture details when it is patched. If you patch to a fader handle the select button will light up dimly.
- Repeat from step 2 for other dimmers.
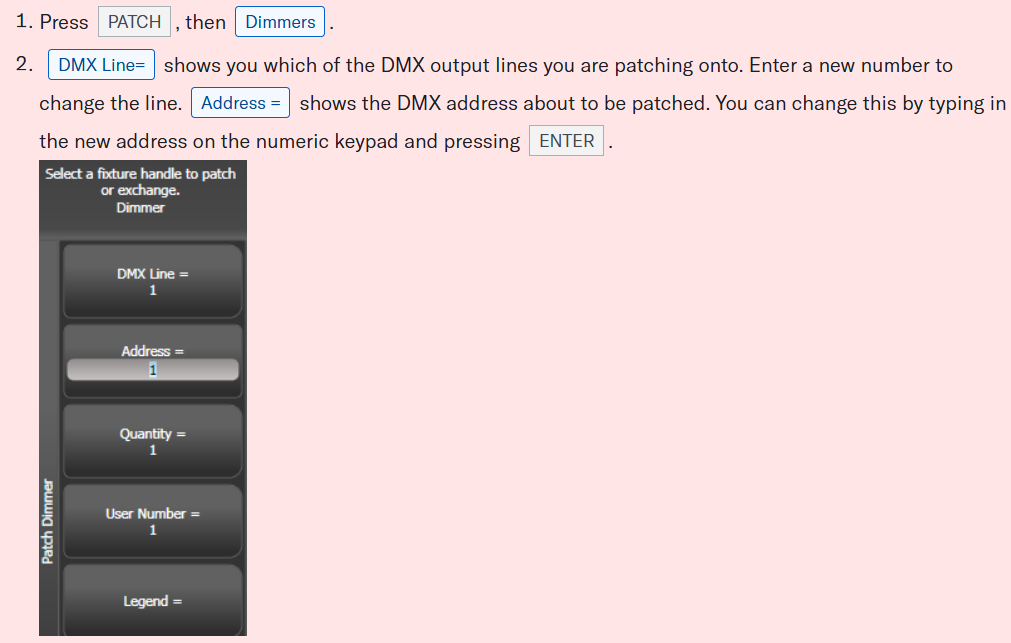
- When setting the DMX address using Address=, you can set the DMX line (universe) as well by entering {line}.{DMX}, for example 2.56 will set DMX address 56 on DMX line 2.
- To see how DMX channels are patched, press Open/View then Patch to show the Patch View window.
- User Number = xx allows you to set a user-defined number for each dimmer or fixture patched, to help you identify them later. You can also edit the User Number from the Repatch Fixture menu.
- You can patch multiple dimmer channels to a single handle. This can be useful if, for example, you want to control all the lights for one area together. To do this, just press the same Fixture Select button again when patching the new dimmer channel. You can tell the dimmer channel has patched OK because the DMX address will increase by 1.
- If you need to remove a dimmer from multiple dimmers on a single handle without losing programming, make a copy of the handle then repatch the copy to the individual dimmer address.
Patching Moving Light Fixtures
Moving light fixtures are more complicated to patch than dimmers because they have more attributes to control, such as pan, tilt and colour, whereas a dimmer channel just has intensity.
Avolites consoles use a “personality” system to control fixtures. This means you don’t have to know how each fixture works, you just tell Titan what you want to do and it will send the right control commands. The console has built-in personalities for most types of fixture, which tell it what attributes are available and how to control them. If the console does not have the personality for your fixture, you can download further personalities from the Avolites website, create your own using the Personality Builder application installed on the console,
चलती हुई लाइट फिक्स्चर (Moving Light Fixtures) को पैच करना डिमर (Dimmer) चैनल्स की तुलना में ज़्यादा जटिल होता है क्योंकि इनमें पैन, टिल्ट और कलर जैसे कई अतिरिक्त गुण (Attributes) होते हैं, जबकि डिमर चैनल में सिर्फ इंटेंसिटी (Intensity) को ही कंट्रोल किया जाता है।
Avolites कंसोल एक “पर्सनालिटी सिस्टम” का उपयोग करता है जिससे फिक्स्चर को कंट्रोल करना आसान हो जाता है। इसका मतलब यह है कि आपको हर फिक्स्चर के काम करने के तरीके को जानने की ज़रूरत नहीं है – आप बस Titan को बताते हैं कि आपको क्या करना है, और वह अपने आप सही कंट्रोल कमांड्स भेज देता है।
इस कंसोल में ज़्यादातर फिक्स्चर के लिए पहले से ही पर्सनालिटी फ़ाइलें मौजूद होती हैं, जो बताती हैं कि उस फिक्स्चर में कौन-कौन से गुण (Attributes) हैं और उन्हें कैसे कंट्रोल करना है। अगर किसी फिक्स्चर की पर्सनालिटी कंसोल में नहीं है, तो आप उसे Avolites की वेबसाइट से डाउनलोड कर सकते हैं, या फिर कंसोल में पहले से इंस्टॉल Personality Builder एप्लिकेशन से खुद बना सकते हैं।
How to Patch
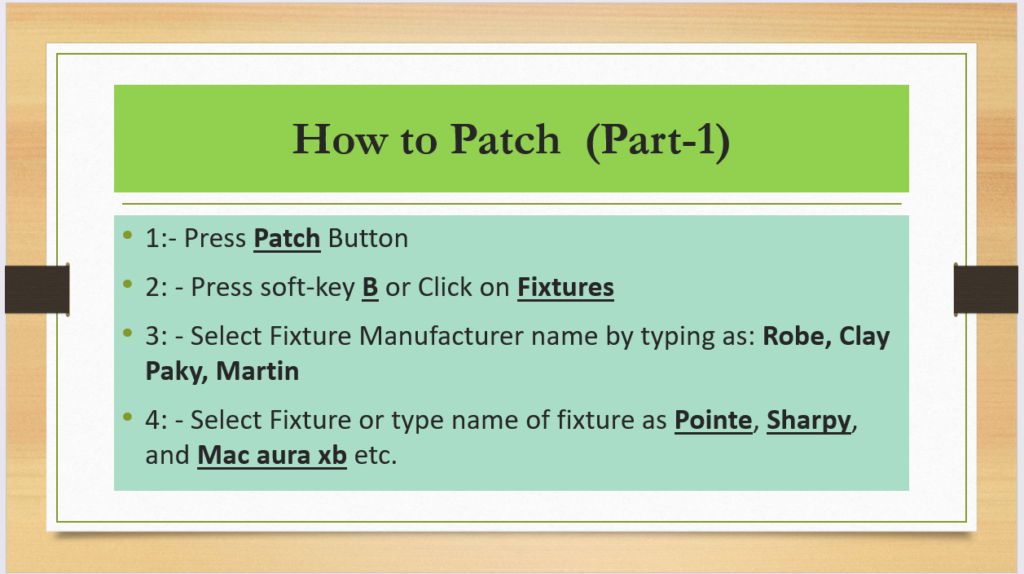
- 1:- Press Patch Button
- 2: – Press soft-key B or Click on Fixtures
- 3: – Select Fixture Manufacturer name by typing as: Robe, Clay Paky, Martin
- 4: – Select Fixture or type name of fixture as Pointie, Sharpy, and Mac aura xb etc.
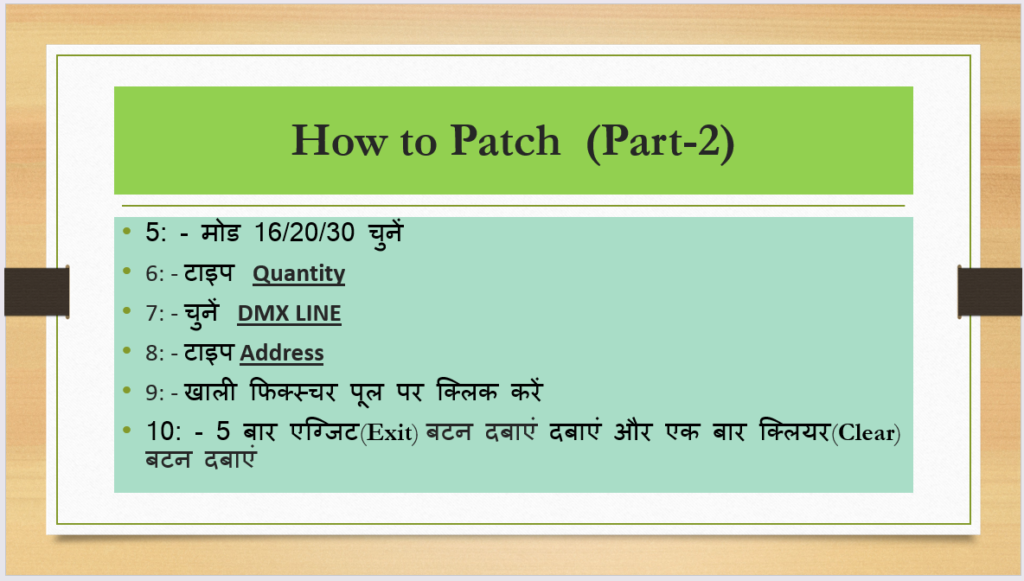
- 5: – Select Mode 16/20/30
- 6: – Type Quantity
- 7: – Type DMX LINE
- 8: – Type Address
- 9: – Click on empty fixture pool
- 10: – Press Exit 5 times and press clear once
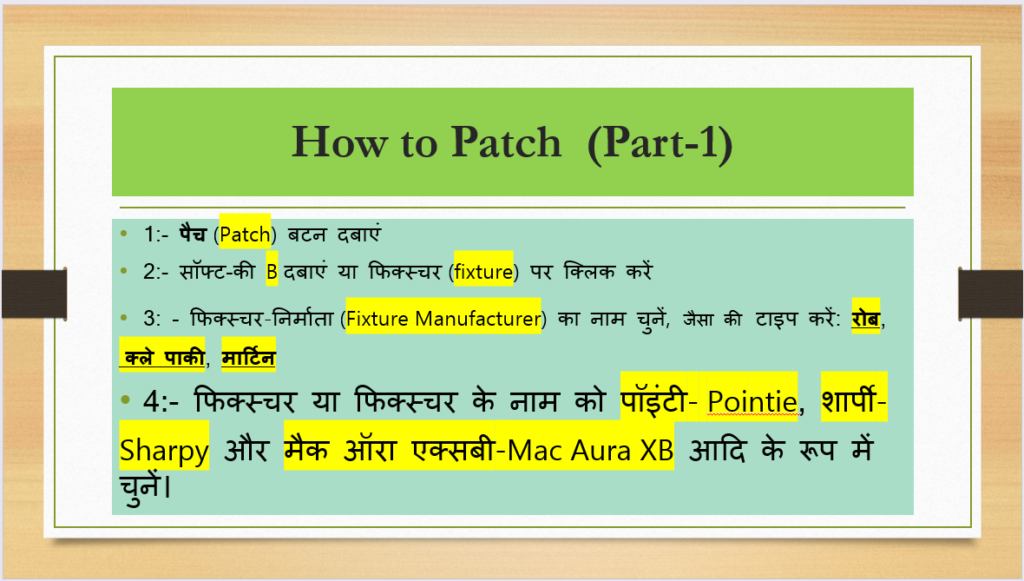
- 1:- पैच (Patch) बटन दबाएं
- 2:- सॉफ्ट-की B दबाएं या फिक्स्चर (fixture) पर क्लिक करें
- 3: – फिक्स्चर-निर्माता (Fixture Manufacturer) का नाम चुनें, जैसा की टाइप करें: रोब, क्ले पाकी, मार्टिन
- 4:- फिक्स्चर या फिक्स्चर के नाम को पॉइंटी- Pointie, शार्पी-Sharpy और मैक ऑरा एक्सबी-Mac Aura XB आदि के रूप में चुनें।
- 5: – मोड 16/20/30 चुनें
- 6: – टाइप Quantity
- 7: – चुनें DMX LINE
- 8: – टाइप Address
- 9: – खाली फिक्स्चर पूल पर क्लिक करें
- 10: – 5 बार एग्जिट(Exit) बटन दबाएं दबाएं और एक बार क्लियर(Clear) बटन दबाएं
See Next

Hindi Theory
Thanks for reading this Topic
Click on Previous for New Show
Click on NEXT for Re-Patching